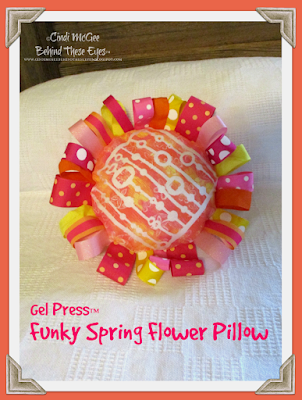
Gel Press™ Funky Spring Flower Pillow - Gel Press™ Blog Hop Time!
Enter by going to all of the blogs listed here. Leave a comment on the Gel Press™ Blog telling us your favorite project! You can comment bewteen now and April 7! Winner to be announced on Gel Press Junkies on FB and Gel Press™ product page April 8th! You will have your 8" Round Gel Press™ to make a project to play along with our Earth Day designs April 22! Enjoy the projects and good luck!
I am having such fun learning about the many creative options you have when crafting with Gel Press™ Plates! Having the available in so many sizes, like this 8” round, also makes projects simpler! The round shape of this plate just seemed perfect for the center of a fun flower - so the Funky Spring Flower Pillow was born!
Materials:
DecoArt® Americana® Multi-Surface Satin™ acrylic paint - Pink Tropics, Shrimp, Chick
Brayer
White cotton fabric
JudiKins™ Funky Flowers Cube Stamp
JudiKins™ KITE Stencil - Beaded Curtain
Beacon™ 3-in-1 Adhesive
Offray® Ribbons - polka dots, stripes, solids in coordinating yellow, pink and coral tones
Scissors
Instructions:
Cut white cotton fabric into two squares about 10”. (Tip - I use bed sheets for a LOT of my projects requiring white fabric! It’s an inexpensive option for crafting fabric!)
Apply small drops of each color of paint to 8” round Gel Press™ plate.
Use brayer to spread paint without totally blending colors.
Randomly stamp surface with 4 different flowers from Funky Flowers cube stamp - cleaning stamp between each application - to lift paint from Gel Press™ plate.
Place Beaded Curtain KITE Stencil over plate.
Place square of white fabric over plate and gently press with hands to transfer to fabric. I love the look of the square stencil against the round printed image.
Repeat to make second print. Trim off corners about 1/2-1" around printed images.
To make your flower petals, cut strips of coordinating ribbons about 5" long. Fold each in half, use 3-in-1 Adhesive to mount, with loop facing inward, on front of one print, with glue line aligned with edge of printed image.
Continuing adding ribbon loops/petals until you have about 3” of area without ribbon.
Place a line of 3-in-1 Adhesive around outside edge of image on 2nd printed fabric leaving about 3” of area without glue — align area without glue with area without ribbon and place face down over first piece with ribbon loops/petals.
Let glue dry. Carefully turn pillow inside out.
So many options... so little time!


how cute is that pillow!! Can I have it? :)
ReplyDeleteLol thanks! It was a fun project to create!
DeleteThat is so sweet!
ReplyDeleteThanks Mary!
DeleteMy granddaughter would love to make one of these! So cute!!
ReplyDeleteThanks - Yes, it would be a perfect project for a girls bedroom!
DeleteWow! How fun!!!
ReplyDeleteI love this idea. I have old sheets that I can cut up for this project. thanks for the idea!
ReplyDeleteThanks! Repurposed sheets are my go-to fabric many times! I also love to get material from clothes at Goodwill! Leather, silk, sometimes even fur can be found there!
DeleteLOVE the no sew pillow, how cute!
ReplyDeleteThank you!
DeleteSo colorful and cute! Love it!
ReplyDelete~kim
Thank you!
DeleteThat's so cute!
ReplyDeleteThank you Cyndi!
DeleteGood instructions - much appreciated!
ReplyDeleteThank you Anne! Glad you found them helpful! :0)
DeleteGreat details as always Cindi! It looks like fun!
ReplyDeleteThanks Carole! I am having a lot of fun learning about what I can do with my Gel Press plates!
DeleteThank you!
ReplyDeleteThanks!
ReplyDeleteLove this project! Such a cute idea!
ReplyDeleteThank you Kathy!
DeleteSo very cute! Love the colors and the "fab" idea!
ReplyDeleteThank you Kristi!
DeleteWow - how cool!
ReplyDeleteThe print on fabric is fabulous and the pillow complete is so cute.
ReplyDeleteThank you Tommy Jo!
DeleteLove the "gelli" pillow. What a fabulous idea. Maybe I will be able to make one soon?
ReplyDeleteGel Press printing is so versatile - that's why I love it! Thanks for your comment!
DeleteThis is awesome!
ReplyDeleteThanks Teresa!
DeleteThis pillow is just too cute! Love the colors! Thanks for sharing. God bless.
ReplyDeleteThank you Marji!
Deletethanks for sharing love the colours
ReplyDeleteThanks!
Deletewhat a cute idea! Colours are super. Thanks for this gr3at idea.
ReplyDeleteThanks!
DeleteThis is fun, great idea, loving the colors.
ReplyDeleteThanks Steph!
DeleteWhat a fun way to see dat you made it on fabric!
ReplyDeletethans for this great idea!
Wiebine
It was pretty easy to do! Thanks for commenting!
DeleteIt turned out adorable!
ReplyDeleteThank you!
DeleteI haven't yet tried printing on fabric, but I think it will make for interesting quilts! I'd love to dye my own fabric but can't justify the work, expense etc. However, gel printing...that's a whole other thing!
ReplyDeleteOOOH great idea! Would LOVE to see your finished quilt!
DeleteI love the pattern and colors you used on this pillow!~
ReplyDeletemarilyn sandau
Pin cushion would be a great idea Lea!
ReplyDeleteThis is so adorable. I want to make one for my granddaughters room.
ReplyDelete