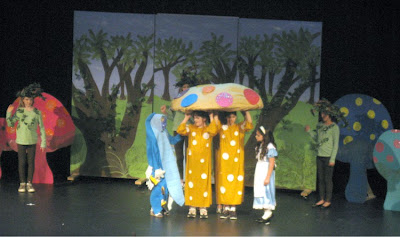
This past week was our local elementary school Drama Club presentation of
Alice in Wonderland. The kids did a fantastic job and the teachers who spent countless hours volunteering their time to help them learn their lines, creating costumes and sets, etc. should be very proud of all they accomplished! While I wasn’t as involved with set and costume design with this year’s play as I was with last year’s
Pinocchio, I did get a chance to let my creative muse play a bit by embellishing some maiden’s gowns and making headpieces for them, adding flowers to some rose bush costumes, and giving our table leg

costumes a bit of a wood grain. The most challenging assignment I undertook this year was the giant mushroom. I found out last Monday they needed a very big mushroom for a scene in the play. It needed to be 3-dimensional, carried by some of the kids onto

the stage. The only problem was the dress rehearsal was Wednesday, and the sets were being delivered on Tuesday. That gave me one day to create a funky fungus. As with all crafting experiences, things don’t always go as planned. The mushroom had 3 incarnations before I reached the final result.
 |
| Failure #1 - Umbrella, extended, stuffed with bags, - too flimsy | |
|
 |
| Failure #2 - A patio umbrella with fabric sewn on, then stuffed - too heavy. |
 |
| Almost right - stem complete but still tippy, glittering spots |
It was sort of like
Goldilocks and the Three Bears instead of
Alice in Wonderland. The first mushroom used an umbrella as the base, with extensions to make it a bit larger. The plan was to stuff it with empty shopping bags (knocking on my neighbors doors and a trip to the local grocery store’s recycling bin provided what I needed) and cover it with fabric. Well, it was too small and the umbrella was too flimsy to hold the top in place. On to plan B. Out came the patio umbrella. Large enough - Yes! I hand stitched the fabric around all the fabric edges of the umbrella, then stuffed it with the bags. It looked pretty good, but when I tried to lift it I realized it was WAY TOO HEAVY for four children to carry on stage. Now I had too small, and too heavy, when was I going to find just right? Okay, time was running out and I still needed to craft the perfect humungous fungus. Plan C - raid my stash of large sheets of cardboard in the attic, cut an irregular circular base. Hot glue the fabric to the cardboard, stuffing with the bags. It even had folds of fabric underneath. The mushroom was coming together, but still needed a stem. A piece of plastic pvc piping, wrapped in a large sized pool noodle, with strips of fabric hot glued on was the right size, and was sturdy enough. Then came the question of keeping the top on the base/stem. I cut out an opening in the center base, and stuffed the stem inside until it supported the top. In order to ensure the bags could be “fluffed” as necessary to ensure a plump mushroom after transportation, I cut two hand sized holes, one in each side of the top, and then disguised them with colorful spots of card stock. Additional card stock spots, some embellished with large chunky glitter were applied. The Mushroom Tale ends with a happy ending - after 7 hours, the humungous fungus fit in well with the other adorable sets on stage.
 costumes a bit of a wood grain. The most challenging assignment I undertook this year was the giant mushroom. I found out last Monday they needed a very big mushroom for a scene in the play. It needed to be 3-dimensional, carried by some of the kids onto
 the stage. The only problem was the dress rehearsal was Wednesday, and the sets were being delivered on Tuesday. That gave me one day to create a funky fungus. As with all crafting experiences, things don’t always go as planned. The mushroom had 3 incarnations before I reached the final result.


Comments
Post a Comment