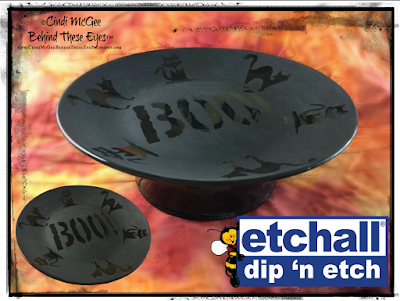
BOO! & Meow Too! - Etchall® Etched Dessert Stand
Even though it's only August, Autumn is popping up in all the retail stores and it's the perfect time to begin creating decorative projects for Fall, and for my favorite holiday of all - Halloween!!
I'm not sure what it is that makes me love Halloween so much - perhaps it just goes hand in hand with my love of scary movies & Stephen King books, my love of creating home made costumes, or the fact that when you dress up as something scary, or even silly, it gives you a chance to step outside yourself just a bit even for a short time. Join the fun, be silly, have fun - act like a kid again no matter what your age! And yes.... eat lots of chocolate too!
I created this etched dessert stand to hold Halloween sugar cookies I'll soon be baking, but it would also be perfect for creepy cupcakes, or even to display a round cake with some fun, spooky decorations. By masking out the black cats and lettering, the shiny black surface of the plate makes them stand out against the etched, matte background.
Since I admit I'm a bit of a creative "mad scientist", I decided to try etching this project in an unexpected way - rather than use etchall® creme - I used etchall® dip n' etch, which is normally not used for etching things like plates.... cue the bubbling beakers & test tubes and creepy music......
Materials:
- etchall® dip n' etch OR etchall® etching creme
- etchall® etchmask Stencil ComboPak
- etchall® Swivel Knife or craft knife
- Black ceramic plate & bowl - Dollar Tree
- Electronic die cutting machine to cut spooky cats (or you can use any Halloween themed stencils, or you can trace a printed image and cut it out from etchmask)
- BOO! Stencil (or you can use the electronic die cutting machine to cut your lettering, or you can trace a printed image and cut it out from etchmask)
- Beacon Power-Tac™ Adhesive
- Paper towels
- Large round plastic container or bowl - large enough to hold the plate over when finished etching....
- Protective gloves
If using an electronic die cutting machine, find desired copyright free clip art images from the internet and resize to about 2" x 2". I used two different spooky cat images. Cut 3 of each cat from sheet of etchmask.
Remove cats from backing and mount to outer edges of surface of the plate - alternating between cats, and spacing as equally as possible. (You could measure with a ruler to ensure they are evenly spaced.... but we mad scientists prefer to "eyeball" things....)
Place the BOO! stencil onto a scrap piece of etchmask. Trace lettering. Use swivel knife (or craft knife..... my awesome swivel knife seems to be lost in the laboratory right now....) to carefully cut around lettering, leaving the backing in place. Remove etchmask from around the lettering.
Place transfer sheet over the lettering and press to adhere. Lift lettering from backing paper, place onto center of plate and press to transfer to plate. Using the transfer paper ensures your lettering remains perfectly aligned.
Now is when things got a bit weird...... I could have applied etching creme to the surface of the plate. But, I wanted to try an experiment. If you want to go the less messy, easier to do route - and still have great results, use the etchall® creme!
 Do the next step over something you don't care gets messed up just in case - I use a well worn cutting mat for things like this.... Put on protective gloves. Place a layer of paper towels over the protective surface. Place the plate in the center of the paper towels. CAREFULLY and SLOWLY pour the dip n' etch into the plate all the way to the top rim. Let set 15 minutes.
  Wearing the protective gloves, and still working over the protective surface, CAREFULLY lift up the plate and pour the dip n' etch into the wide plastic bowl. It is easier to do this over a bowl larger than the plate, in case of drips and potential spillage. It also made it easier to return the dip n' etch to the bottle itself as the plastic was more pliable and had deeper sides. Dip n' etch can be re-used, so don't skip this step...
Rinse the plate to clean thoroughly. Remove etchmask.
To create the raised dessert stand, apply Beacon Power-Tac adhesive around the bottom rim of the bowl. I left my bowl shiny to accent the shiny black cats and lettering on the plate. Place the etched plate centered over the bowl and let dry.


oh I love this kitty project. thanks for sharing
ReplyDeleteThank you Maria! :)
Delete