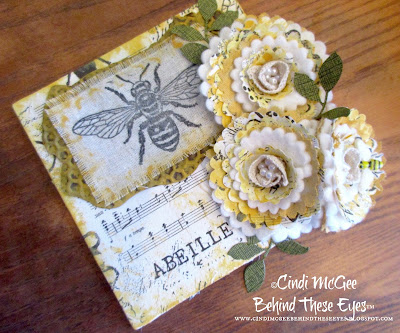
"ABEILLE" Bee Mixed-Media Canvas - Rebekah Meier Blog Hop
ABEILLE MIXED-MEDIA CANVAS
Many of the Designer Craft Connection Designers are participating in a blog hop featuring Rebekah Meier Designs Fabric Elements™. The kit I received was to make a Mini Paper Quilt Kit. I went in a bit of a different direction with the contents - but I’m pleased with the finished piece. One of the things that I liked best from working with the kit was the ability to take patterned tissue paper, back it with the EZ-Steam™ II and the Stitch-N-Tear® Sheet, and then create my dimensional die-cut flowers.

Be sure to visit the Designer Craft Connection blog for information on this great giveaway package! To enter to win, you need to comment on my post, but then also use the Rafflecopter widget on the DCC blog too.

Be sure to visit the Designer Craft Connection blog for information on this great giveaway package! To enter to win, you need to comment on my post, but then also use the Rafflecopter widget on the DCC blog too.
Materials:
Rebekah Meier Designs Fabric Elements™ Mini Paper Quilt Kit - Stitch-N-Tear® Technique
Makin’s Clay® - Brown, White
Makin’s® Texture Sheet Set - Honey Comb
Sizzix® Big Shot
Sizzix® Thinlits Die Set 9PK - Garden Greens Folliage
Sizzix® Bigz Die - Flower, 3-D Wrapped by Eileen Hull
DecoArt® Americana Decor™ Chalky Finish Paint - Delicate, Inheritance
Beacon™ Fabri-Tac Adhesive
Beacon™ Fast Finish Decoupage
Plaid® Mod Podge® Mod Mold - Royal Icons
Staz-On™ Ink Pad - Jet Black
JudiKins™ Large Bee rubber stamp
6 x 6” Canvas
Forest green card stock
Extra pearl beads
Black and yellow permanent markers
Ribbon to form hanging loop on back
Instructions:
Peel off non-grid marked side of EZ-Steam™ II sheet. Place tissue paper face down on flat surface and apply sticky side of EZ-Steam™ II, smoothing with your hands as it adheres. Peel off grid-marked paper and apply Stitch-N-Tear® Sheet.
 |
| Ike helps. |
Place a small amount of Delicate and Inheritance Chalky Finish Paints into a plate (or other palette, add a small amount of water to the Inheritance paint to create a paint wash. Use sponge from kit (or cat's paw if they are so inclined to help like Ike was...) to add touches of the “Inheritance” paint wash to the surface of the tissue paper. Let dry.
 |
| Figure 1. The guilty dog. |
The kit came with a piece of texture foam, however, my dog Mason decided it would be fun to steal it off the kitchen table and eat most of it. (See Figure 1 - guilty dog overlooking his naughty work - note said spoiled dog has more than enough toys of his own to play with.) So on to plan B - I used a paintbrush to apply a bit of the Delicate Chalky Finish Paint to the Honey Comb Makin’s® Texture Sheet, and then used that as a stamp to add random texture to the tissue paper. Let dry.
Die cut 6 large flowers and 3 small flowers from backed tissue paper with Sizzix® Big Shot™ and 3-D Wrapped Flower die. Cut 3 large flowers and 3 small from batting sheet. Cut 3 large and 3 small flowers from Osnaburg fabric.
Sponge edges of Osnaburg flowers with a light touch of the Inheritance paint wash. Let dry.
 Using Beacon™ Fabri-Tac™ to hold them together, assemble the flowers per the instructions, starting with a small tissue flower, then the small batting flower, then the small Osnaburg flower, then two layers of the large tissue flowers, the large batting flower, and ending with the large Osnaburg flower.
Cut three 3” strips of the crochet lace from the kit. Coil each one and mount in the center of each flower.
Add 5 pearl beads to the center of each flower (Note: The kit came with 2, I added more from my bead stash.)
 Die cut assorted leaves from forest green card stock using Big Shot™ and Sizzix® Thinlits Die Set - Garden Greens Folliage.
Cut a piece of the NON-BACKED tissue paper the size of your canvas. Use Fast Finish Decoupage to mount tissue to canvas. Let dry.
Use sponge from kit to add a touch of the Inheritance paint wash to the tissue paper on the canvas.
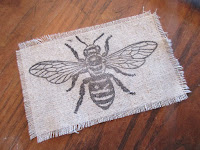
Ink JudiKins™ bee rubber stamp with Jet Black ink and stamp onto piece of Osnaburg. Trim to rectangle around image. Carefully remove some threads from all sides for a frayed edge. Add a touch of the Inheritance paint wash to the edges with the sponge.
Roll enough brown Makin’s Clay® to fit beneath the stamped Osnaburg to very thin - less than 1/8”. Gently texture with Honey Comb texture sheet. I left my clay in the freeform shape it was rolled into rather than cutting into a rectangle for a mat.
Sponge partial surface of textured clay with Inheritance paint, allowing some of the brown to still show through. Let dry. (Under most circumstances Makin’s Clay® is fully dry in 24 hours. However, very thin sheets like this are usually dry in less than an hour.)
 Use Fabri-Tac™ adhesive to mount textured clay to top left area of canvas. Mount stamped bee over clay.
Arrange flowers in lower right area of canvas and mount with Fabri-Tac™. Mount assorted leaves as desired.
Mold bee with Plaid® Mod Mold® and white Makin’s Clay®. Let dry about half an hour. Add details to bee with yellow and black permanent markers.
Mount bee to one of the flowers.
Mount a loop of ribbon on the back to hang the canvas.


at moments like this i am glad we have no more pets, so sorry your dog attacked your stuff - beautiful work!!
ReplyDeleteLol - having pets is like having small children much of the time - they get into mischief, but we love them anyway!
DeleteCindi, this is lovely!
ReplyDeleteThanks Steph!
DeleteBeautiful work. Love the flowers.
ReplyDeletelove the story of your pets - you created a wonderful project - love how everyone is using the same things so differently
ReplyDeleteBarb Housner
Thank you Barb - creating with fuzzy helpers can be a challenge sometimes!
DeleteOh you made a bee too! It's lovely.
ReplyDeleteGreat job with lots of awesome details ( it was a good thing your pup is well loved though, lol )
ReplyDeleteYou are so right.... creating with fuzzy helpers can be a challenge sometimes! Thanks!
DeleteWonderful. Love the large flowers and bees.
ReplyDeleteThank you Sue!
DeleteThis is a gorgeous canvas Cindi. Nice work!!
ReplyDeleteThank you Trista!
DeleteThis is so pretty! I love your take on the kit and those flowers!
ReplyDeleteThank you Nadine!
DeleteI love this Cindi. I know what is it like to have your dogs eat your projects though. :)
ReplyDelete