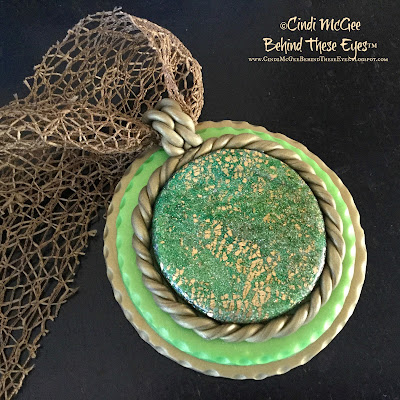
Green & Gold Shimmer Pendant
Recently, I attended the Polymer Clay Adventure in Paradise Retreat and had the opportunity to take an amazing workshop with Lisa Renner. Part of Lisa’s workshop included using two surface techniques to create background effects for the project. Being the bit of mad scientist that I tend to be, I decided to try combining both techniques. The result was a veneer that I used to create the centerpiece of this pendant. You can use any color of clay or paint to create the first layer. Roll the clay into a flat sheet on the thickest setting of your clay machine, apply a few drops of acrylic paint in complementary colors, and then use your fingers (or a brush if you must) to gently blend the tones to create variated color. Let the paint dry thoroughly.
 Then roll the clay through a clay machine on a thinner setting to cause the paint to begin to crack and reveal the color beneath.
For the metallic crackle, which can be done without doing the steps above first, but I chose to try afterwards, simply lay the leafing sheet/foil over the clay and burnish to transfer the leafing/foil. Then roll through the machine, reducing settings, until the foil crackles as desired.
Thanks, Lisa, for sharing two awesome techniques that I am anxious to continue experimenting with!
 Then roll the clay through a clay machine on a thinner setting to cause the paint to begin to crack and reveal the color beneath.
 For the metallic crackle, which can be done without doing the steps above first, but I chose to try afterwards, simply lay the leafing sheet/foil over the clay and burnish to transfer the leafing/foil. Then roll through the machine, reducing settings, until the foil crackles as desired.
Thanks, Lisa, for sharing two awesome techniques that I am anxious to continue experimenting with!
For my base layer on the sample below which was used on the pendant, I used premo! Sculpey® Accents Yellow Gold Glitter clay. I used a combination of teal/turquoise, and green shades to create the blended paint background. The result was pretty, but not what I was envisioning in my mind, so I took it a step further and applied the gold leafing over the veneer and then rolled it again to crackle the foil.
Since the veneer was quite thin, I created a base disc of scrap clay and wrapped it in the veneer to create the centerpiece for the bead. I used premo! Sculpey® Accents Antique Gold and Bright Green Pearl to create the other elements for the pendant. I love the slight shimmer they add to the finished piece. I used my Makin’s Professional® Ultimate Clay Extruder® to extrude strands of the gold clay to twist and wrap around the focal element, and to create the bail. The detailing around the discs of gold and green clay was created with the sphere tool from my Makin’s Professional® Professional Tool Kit.
Once the piece was baked, I added a thin layer of Sculpey® Clear Liquid Bakeable Clay and used a heat tool to quickly cure it and create the gloss sheen. I had this unique ribbon in my stash and it seemed like the perfect choice to use to hang the pendant.


Comments
Post a Comment